- Casting uses molten lead, pouring it directly into a mould. Swaging uses room temperature lead, from a spool of wire or a pre-cast cylinder (core) made to fit into the swage die easily

- Hot lead expands the mould, changing its size. Then the lead cools enough to solidify, which shrinks the mould. The mould cannot hold a constant diameter as it is being used. It is opened and exposed to the air every time a bullet is released, and hit with much hotter molten lead when the next bullet is poured. Basic physics prevents the diameter from being as constant as if the mould were kept at one constant temperature. For example, a .0015 inch diameter control is considered rather good for cast bullets before sizing.
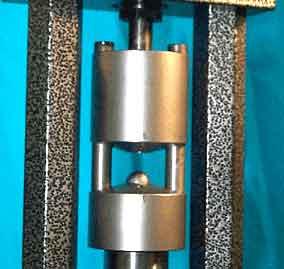
- Swaging dies remain at room temperature. They operate using pressure to flow the lead. The diameter of the die is not changed by constant temperature changes. Basic physics indicates that the diameter control over bullets made this way, by swaging, just has to be more consistent than casting allows. For example, a .0001 inch diameter control is considered the upper acceptable limit for a swage die, which is more than 10 times better than the best cast tolerance.
- Hot lead expands the mould, changing its size. Then the lead cools enough to solidify, which shrinks the mould. The mould cannot hold a constant diameter as it is being used. It is opened and exposed to the air every time a bullet is released, and hit with much hotter molten lead when the next bullet is poured. Basic physics prevents the diameter from being as constant as if the mould were kept at one constant temperature. For example, a .0015 inch diameter control is considered rather good for cast bullets before sizing.
- Casting is done in a split mould, which swings open and closed on every cast, wearing the pivot pin, and exposing each half of the mould face to cool room air while the hot lead bullet retains heat on the other side. Swaging is done in a solid die with a diamond-lapped hole, pressing material under tons of pressure and ejecting it back out the same end.
- The mould is forced to expand and contract unevenly from heat, and alignment is compromised because of pivot wear. The two halves of the mould must easily open and close, on every cast, which means that there must be some "slop" or manufacturing tolerance. This further erodes the possible alignment precision, limiting the precision of bullets in regard to both roundness and the lateral half alignment. Roundness of 0.001 inch variance is considered a good spec for a cast bullet, more than 10 times the average for swaged bullets.
- A swage die is a solid cylinder with a hole in it. The bullet material is pressed into one end, and ejected out the same end after forming. The die remains round, at the same temperature, on every stroke, for every bullet. There is no hinge to wear, no pivot action, and no split halves situation requiring constant alignment. The bullet remains absolutely concentric with the bore of the die. Roundness of 0.0001 inch is considered the limit of acceptable tolerance for a swaged bullet, and the typical roundness is closer to 50 millionths of an inch.
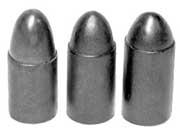
- Nearly perfect round balls without any sprue can be swaged in the Corbin BSK-1 ball swaging kits for Corbin presses. Two steps swages a piece of lead wire to exact weight and then forms it to a roundness unheard of in casting.
- The mould is forced to expand and contract unevenly from heat, and alignment is compromised because of pivot wear. The two halves of the mould must easily open and close, on every cast, which means that there must be some "slop" or manufacturing tolerance. This further erodes the possible alignment precision, limiting the precision of bullets in regard to both roundness and the lateral half alignment. Roundness of 0.001 inch variance is considered a good spec for a cast bullet, more than 10 times the average for swaged bullets.
- Casting does not permit easy change of the nose and base shapes, since the top of the mould is generally a flat end of the bullet with a connected sprue (nose or base, depending on the design of the mould). Swaging uses removable punches to change shapes in the straight-hole type dies (LSWC-1), and a single base punch to change shapes in the tapered or ogive-type die (PF-1).
- Cast bullets require a specific mould investment for each and every bullet shape and weight. The moulds are limited in what they can do with one end of the bullet (inserting a plug can allow a hollow base, but it is more tedious to insert and remove than using a flat base bullet mould). Casting also requires filling the entire mould cavity, so you can only make one weight with the mould. Swaging dies can be filled with different amounts of lead to make nearly any weight of bullet.
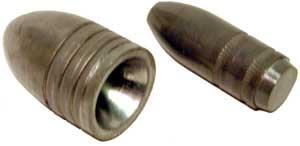
- Swaged bullets can be made in a huge range of weights for a single die investment. Each die can make many weights, but also by changing technique or using different nose or base punches in the dies, it takes only seconds to change the bullet base and nose shapes. Hollow bases, cup bases, boattails, heel bases, flat bases...all are just as easy and fast to make. The bullet is simply a mirror image of the punch ends. A cavity on the punch makes a nose or boattail on the bullet. A projection on the end of the punch makes a hollow point or hollow base shape. And you can press the bullet with one punch, then change punches and use another to get exotic shapes that couldn't possibly be cast or swaged with just one stroke (such as pear shaped or blind hole cavities sealed on both ends but perfectly centered in the bullet).
- Cast bullets require a specific mould investment for each and every bullet shape and weight. The moulds are limited in what they can do with one end of the bullet (inserting a plug can allow a hollow base, but it is more tedious to insert and remove than using a flat base bullet mould). Casting also requires filling the entire mould cavity, so you can only make one weight with the mould. Swaging dies can be filled with different amounts of lead to make nearly any weight of bullet.
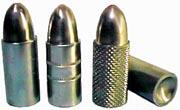
- It is much easier to make multi-part bullets with swaging, because all you have to do is change the punches in the same die to make the nose and base halves of the bullet, then change to a nose and base combo to swage them together. Casting requires different moulds for base and nose sections plus removable plugs.
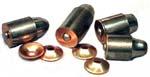
- Multi-part bullets are faster to swage in a single die, just by changing the punches. Make one half of the bullet with a nose and hollow cavity base punch. Change punches and make the other half with a tang that fits into the cavity, and a cup base (or whatever base shape you want) on the other end. Then slip the two halves together and swage them lightly in the same die, using a nose and base punch as if it were a solid bullet.
- Multi-part bullets can be made with casting, by using two different dies, both of which may require tedious plug inserts that have to be inserted and removed for each pour. Then assembly has to be done mechanically by hand, usually not to the same concentricity as with swaging together in a single die cavity.
- Multi-part bullets are faster to swage in a single die, just by changing the punches. Make one half of the bullet with a nose and hollow cavity base punch. Change punches and make the other half with a tang that fits into the cavity, and a cup base (or whatever base shape you want) on the other end. Then slip the two halves together and swage them lightly in the same die, using a nose and base punch as if it were a solid bullet.
- Casting allows grooves to be cast into the bullet sides, since the bullet is removed by tapping on the mould and letting the bullet fall out sideways from the two open halves. Swaging does not permit this, as the bullet must go in and come out the same hole.
- Cast bullets with lube grooves are generally cited as the reason for casting rather than swaging. But the time required to melt lead, cast bullets, sort them, and then lube/size them, is more than it takes to roll grooves or apply diamond knurling to a smooth-sided swaged bullet and dip or spray lube onto it.
- Swaged paper patched bullets are both more precise and easier (and faster) to make than cast paper patch bullets, since one stroke completes the bullet at exact diameter, and there is no lead to melt (if one uses lead wire). Lube grooves add drag to a bullet, so for better long range BC the smooth sided, paper patched bullet is technically superior.
- Swaged lead bullets can be knurled with the HCT-2 knurling tool, or grooves can be applied with the HCT-3 grooving tool. Both are roll-embossing type tools that do not remove any lead, so the weight stays precisely the same before and after the operation.
- Swaged BGtm Bullets can use a trade-marked Corbin copper fouling scraper disk called the "Base Guard" to remove fouling on every shot, without any lube at all! This is not allowed by the rules of some black powder matches, but it is great for hunting.
- Cast bullets with lube grooves are generally cited as the reason for casting rather than swaging. But the time required to melt lead, cast bullets, sort them, and then lube/size them, is more than it takes to roll grooves or apply diamond knurling to a smooth-sided swaged bullet and dip or spray lube onto it.
Cost Comparison:
These are a few of the comparisons between casting and swaging. The cost of swaging can be about the same as casting if you consider the cost of...
- Lead pot
- Sizer/lubricator
- Mould handles
- Ladle
- Bullet lube or paper patching
- Ingot moulds
- One bullet mould per weight and shape and caliber.
Whereas for swaging, a complete outfit for use with your existing reloading press would be...
- PRO-1-R Pro-swage die
- CSL-2 Swage lube
- LW-10 Lead wire (you can use a core mould and scrap lead, too)
- PCS-1 or PCS-2 Lead wire adjustable length cutter
- CDL-4 Dip or CML-11 spray lube, or paper patching
For a top of the line system, using a much faster and more precise Corbin swage press and the -S type die that fits it, you would only need...
- CSP-1 S-Press (2x more speed and strength, 3x more power than a reloading press)
- LSWC-1-S Lead SWC (shouldered) die and punch set
- CSL-2 swage lube
- LW-10 lead wire
- PCS-1 or PCS-2 lead wire adjustable length cutter
- CDL-4 Dip or CML-11 spray lube, or paper patching
Consider also the fact that you can have any weight you want, any time you want, by simple adjustment. It could take over 500 different moulds to make the weights you could produce with a single swage die! This lets you adjust the bullet to suit your gun and load, instead of being stuck with whatever mould is available in the right shape and diameter. Swage punches and dies can be made to specific order for diameter and shape, or you can use the standard designs which are standard because so many people find them accurate. Also, you can make a swaged bullet from lead wire within a few minutes after deciding to do it. You cut the wire, lightly lube it with clean swage lube, insert in the die, pull the press handle up to swage and down to eject (or tap the knock out for reloading press type dies). It's done. Ready to lube or paper wrap.
Time (Bullets per Hour)
If you were to begin swaging, and your friend started casting at the same moment, you would be finished and ready to lube or wrap 100 bullets before the lead was melted in your friend's pot! You'd be done and at the range before he could clean up and put away the hot mould and pot. With swaging, your time is much more available for shooting, since you waste less of it just getting ready to make bullets and cleaning up afterward. An experienced caster still has to wait for lead to melt. Any responsible caster won't put away a hot lead pot or let his mould sit for long in a hot state. Not only is it dangerous, but the mould can rust badly unless it is wiped out and waxed or put in a vapor-phase-inhibitor wrapping. The actual time to pour lead is just a portion of the total start to finish procedure, even without sizing and lubrication.
The time it takes to actually form a bullet is the time it takes you to pull the handle. The total prep time would have to include cutting cores, which you can do with Corbin tools at about 1000 per hour. An experienced bullet maker can produce around 400-450 finished bullets per hour starting from a roll of lead, including set-up, adjustment, and put-away time.
Two Basic Styles:
In bullet swaging, there are two basic styles of lead bullet, the SWC or shouldered ogive and the tangential or smooth ogive. The difference is very important to understand, because it affects the cost of equipment and number of steps required.
The "semi-wadcutter" style has a shoulder or step between the straight shank and the start of the nose. The nose can be any shape after that point, created by the cavity machined into the nose punch. Because the bullet is formed by pressing lead between two punches in a closed cylinderical die cavity, both the nose and the base punch will by necessity have an edge around any cavity made in them. It would not be possible to use a punch with zero edge thickness. Even a knife edge punch would have some thickness. The swaging pressure pushes the punch walls outward, towad the die. If the edges of the punch are thin, then they will be broken off when the punch is moved under pressure on the down stroke, or broken off when they are pushed into the core material on the up stroke.
With the single swage die with straight hole cavity (LSWC-1 or PRO-1-R), the nose punch will have an edge of at least 0.015 inch thickness. This is the minimum that will survive repeated pressure and slight impact of insertion into the die cavity. Since the bullet is a mirror image of the punch, the bullet will have a 0.015 or larger shoulder. Any attempt to use a single die to make a bullet without a shoulder is doomed to failure from fatigue and breakage of the punch in short order, sometimes only one or two strokes, sometimes after a few hundred strokes.
The small shoulder acts as a fouling scraper, pushing soft powder fouling ahead of it and out the muzzle. Hard fouling of course would score the bullet and not be affected by the shoulder. The shoulder also provides a small edge for the paper patch, if used, to wrap over and present something other than the edge of the paper to the bore. This helps keep the paper in place both when wrapping it and when the bullet is fired. The base of the bullet is formed against an internal punch within the die, which moves back and forth from the die mouth to a fixed position within the die, controlled by the location of a shoulder within the Corbin press ram, in -S and -H type dies, or by the end of an adapter body in the -R type die. It is this punch which ejects the bullet on the down stroke (automatically, in Corbin presses, or by tapping it with a knock out rod in the Pro-Swage die).
The tangential or smooth ogive style, therefore, is made in a die with a semi-blind cavity, shaped like the bullet. The diamond-lapped, curved cavity of the PF-1 point forming die transfers a mirror image to the lead. The internal punch, which remains inside the die during operation, is reduced to a spring steel wire attached to a punch head to keep it from falling out of the die. This "ejection pin" punch pushes the bullet back out by its nose. The internal punch plays no part in actually forming the ogive. It is not really a "nose" punch in that sense.
There are two ways to achieve weight control with the smooth ogive bullet. One is by using a separate Core Swage (CSW-1) die to first adjust the lead weight, and form both ends into smooth flat surfaces. This precise pellet of lead is then inserted into the PF-1 point forming die, and shaped into a bullet. The lead can be pushed more or less far into the die, which results in more or less of a flat tip. If this method is used, the PF-1 die can use a simple ejection pin punch that does not actually seal the end of the die, since the only purpose of the die is to shape the ogive.
The second way is to design the point forming die with bleed holes so that it can be fully pressurized and extrude surplus lead through these holes, adjusting the core weight while the bullet is shaped. To do this, the nose punch must be a very precise, honed fit to the hole in the die, and it must be adjustable in length to allow it to come precisely to the end of the cavity. This is because when the lead is pressurized enough to flow through bleed holes, it also will flow through any gaps and up the ejection pin hole. The end of the ejection pin forms the tip of the bullet, whereas in the first method, the pin is retracted a short distance from the cavity and does not touch the bullet until ejection takes place.
The PF-1-SC or PF-1-HC die and adjustable punch (PUNCH-SA or PUNCH-HA) together form the special combination that makes a single-stroke production of smooth ogive bullets, with full weight control, practical These dies operate in the Corbin presses only, because there is no provision in a reloading press for precise alignment, exact stopping position for various punches, and the cost of building dies for individual brands of reloading presses would exceed the cost of using the right press originally.
The cost of the two-die system is about the same as the special one die system, since the two dies are easier to build. The main consideration would be the speed of production, and the difference in versatility. Using two dies gives you more control over the results. You can use various punches in the first die to create hollow shapes in the core, which are then reshaped to the degree desired in the second operation. Such shapes a pear-shaped hollow points and multi-part bullets are practical with the two-die system. They are not with the single die.
The choice of whether to use the SWC or tangential nose bullet sometimes is influenced by the range. For very long range shooting, where air drag needs to be minimized, the tangential ogive nose is superior. The trade-off is that for medium and short range (up to 300 yards) the SWC shouldered bullet has almost identical performance for less than half the cost of dies. Also, reloading presses are only suitable for the shouldered style bullet die (PRO-1-R) for a number of reasons discussed elsewhere. The difference between a bullet with a .015 shoulder and a smooth tapered ogive tangent to the shank is insignificant in reqard to trajectory or accuracy out to perhaps 300 yards, and has no effect on accuracy at any range (just trajectory). Fortunately, the LSWC-1 type of die can be used as a core swage for the PF-1 die, so it is practical to start with the SWC bullet, try it, and then if necessary add a point form die later. Usually it will not be found necessary.
Quick Summary
Comparision of swaging and casting:
| CASTING | SWAGING | |
| Avg.Time/100 bullets | 60 min | 20 min |
| Startup Cost | $350-$400 | $495-649 |
| Additional Weights | $70-120 | $0-50 |
| Additional Shapes | $70-120 | $0-50 |
| Additional Diameters | $70-120 | $130-230 |
| Hollow base/point add | $70-120 | $50 |
| Lube Grooves | (included) | (HCT-3 2nd op) |
| Knurling | (not possible) | (HCT-2 2nd op) |
| Safety factor | Uses molten lead | Can use cold lead wire |
| Roundness | .001-.002" avg. | .0001-.0002" avg. |
| Diam.control | .001-.0015" avg. | .0001-.0002" avg. |
| Versatility per mould or die | One shape/weight only | Shapes controlled by technique |
Step by Step Swaging:
Swaging is actually easier and faster than reading about swaging! Once you have the dies in front of you and have made your first couple of bullets, you will wonder why you hesitated to use this powerful, fast, precise technology!
In brief, the steps to make a swaged bullet using your reloading press, a PRO-1-R Pro-Swage die, and lead wire, are as follows:
- Using one of the various models of Corbin lead cutters, pass the proper size lead wire through the cutter and move the handle back and forth to cut a test piece of lead. (A chart of length versus weight for any diameter is provided by Corbin in our literature, and on our website, to get the initial setting about right on the cutter.)
- Weigh the cut piece of lead wire, and make any small adjustment needed in the length to be cut, by changing the cutter setting (there is a stop screw on the cutter that determines the core weight that you are cutting off the roll of wire). You want the exact bullet weight, unless you are using the optional core weight adjustment punch, in which case you would add 3-4 grains.
- Place a few drops of Corbin Swage Lube (CSL-2) on a clean cloth or stamp pad, and either roll the core across it or simply touch the lube to put a film on your fingers. Handling the piece of lead wire will spread lube film on the surface, to reduce pressure and prevent leading in the die.
- Put the PRO-1-R die in the head of your reloading press (it fits standard 7/8-14 press threads). Slip the button-type punch base into the ram directly (don't try to use a shell holder in addition, as the punch base replaces a shell holder). Make sure the punch and die align when you move the ram up and down, and if not, clean the slot on the press ram.
- Push the piece of lead wire (core) into the die. Gently move the ram up so that the punch enters the die mouth, but don't apply pressure yet. Adjust the die so that the press can be run all the way to the top of its stroke without encountering any pressure or resistance on the handle. Then lower the die (screw it closer to the press ram) with the ram all the way up, until you can't turn it by hand. (Don't use pliers, please: Plier marks and gouges will reduce the value of your die, and are a sign of mechanical ineptness!)
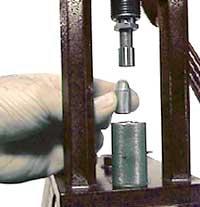
- Now, lower the ram slightly (half an inch or less). Then give the die about a quarter turn closer to the ram. Raise the ram. Repeat this until you start to feel mild resistance on the handle. Then lower the ram. If the bullet comes out with the punch, adjust the die a little lower and swage again. When the bullet stays within the die, it has been expanded to the die bore size and is gripping the die walls. A thin film of swage lube is squeezed between the lead and the die surface, protecting the die.
- Lower the ram all the way. Using a plastic mallet or a length of wood, tap on the ejector rod in the top of the die to push the bullet out, and catch the bullet as it ejects from the die mouth. Examine the bullet. If it isn't completely filled out, put it back into the die and reswage it with a slight downward adjustment of the die. But never jump on the handle, lean on it with all your might, or use a cheater bar because the bullet isn't forming. Those things will only break the die or perhaps something else, and they are not necessary. Something else is wrong, and it is better (also cheaper) to discover and fix it.
- If the bullet is formed completely, you have set up the press right, and you have the right amount of lube. Too much lube (especially with some long nose shapes) can build up in the cavity of the nose punch, which would prevent the nose from filling that space. Just wipe the cavity out with a cotton swab to solve it, and use a little less lube. If the nose forms with an angle that isn't filled out, and you have wiped the nose cavity, then it means that air is being trapped in the die at the tip, likely because the end of the cut wire core is angled too much or the particular nose shape you are using likes to trap air at the tip. To solve it, just turn the bullet over and swage it so the flat base edge goes in first. (Other solutions include using a different shape nose punch, using a smaller diameter core so air can escape around it easier, or cutting the core so that the end is a little flatter.
- Now lock the lock ring on the die, cut the desired number of cores, lube them and run them through the die. When you are done, just remove the die and put it away. The swage lube protects it from normal air moisture. If you live in a particularly corrosive atmosphere (such as near the ocean or in a coal-burning area), spray a little light oil in and on the die before putting it away.
The bullets you have made can now be paper patched, or placed on the rollers of the Corbin HCT-2 knurling tool, or the HCT-3 grooving tool. To knurl or groove the bullets, just swing the handle down to bring the embossing wheel against the bullet, and turn the crank two or three turns while pressing with mild pressure on the padded handle. You can set a stop screw on the tool for both position and depth, or you can simply use "feel" to get the same appearance of groove or knurl each time. The weight won't change. No metal is "cut". It is embossed.
The diameter of the bullet swage die will depend on how you want to prepare the bullet for shooting. If you want to use paper patching, the bullet will need to be about .01 inches smaller than the groove diameter of the barrel (or four times the paper thickness). If you knurl the bullet, the bullet needs to be about the same amount smaller to allow for the height of the diamond tips on the knurling. If you groove the bullet, the diameter will grow slightly on both sides of each groove. But after lubricating the bullet, you can either shoot as it is (some guns find this an advantage) or reswage lightly to bring the diameter exactly back to die size.
Lead: Scrap versus Wire
Lead can come from the same supply that you normally use for casting, or it can be purchased as ready-to-cut lead wire. Scrap lead is cheaper, of course, but it usually has an unknown composition and hardness. Swaging with your reloading press, or the smaller Corbin hand presses, requires moderately soft lead (Bhn 5-6) to avoid building up too much pressure and cracking the die.
Some shooters require very hard lead, or at least believe they do. Although thousands of world class shooters swage pure lead bullets with excellent results, there are some guns, loads, and circumstances where a hard lead alloy is indicated. If so, the only reasonable solution is to cast the bullet, or to use the larger -H or even custom -HC dies in the larger Corbin presses to swage the bullet. Using hard alloys in the -R type (reloading press suitable) or -S type (Corbin -S press suitable) dies will usually result in a broken die, since pressure to swage raises with the square of hardness.
For most black powder shooters, the denser Bhn 5 lead (pure lead) will deliver more energy in the same size bullet (by definition, as density is weight divided by volume, and energy is directly related to sectional density, or weight divided by the square of diameter). This gives the bullet a higher BC than an alloy of the same shape, allowing it to overcome air resistance better.
Pure or reasonably pure lead can be obtained as scrap, in ingots, or recovered and recycled. However you get it, you can cast it into cores (round cylinders that fit into the swage die) with a Corbin adjustable weight, multi-cavity core mould. Casting cores makes sense because it is so much faster than casting bullets, and you can change the shape and weight later when you swage. Core moulds do not use handles. They eject straight up, using pistons and cylinders. The pistons can be set to give you exactly the weight you want, in sets of 3 or 4 at a time. Casting 1000 cores an hour is about average.
Unlike casting bullets, you don't have to worry about appearance. The cores will be swaged to exact weight and shape later. So long as the cores are filled out reasonably well, they will do fine. So you spend far less time inspecting and rejecting them than you would with cast bullets. Also, you don't have to pick up the mould and tap it to eject. The mould mounts to the bench (or to a block of wood held in a vise). A simple ladle pours hot lead into the top plate, which funnels it into the cylinders. Opening the top plate cuts the sprues, but the top plate is very long and does not need to be hit in order to easily open. Once open, a bar at the bottom of the mould is pressed up to eject all the cores at once. Closing the top plate pushes the cores off the side into a waiting box (or all over the floor if you forget the box!).
However, for sheer convenience and speed, nothing beats cutting lead wire! Lead wire is available in 10-lb (70,000 grain) spools from Corbin, in sizes from .1 to .430 diameter. The lead needs to be smaller than the bullet by a considerable amount, so it will drop easily into the die. The lead acts like putty under swaging pressures (20,000 psi and up). It will fill the die, if it fits inside before the punch needs to develop pressure. Using too small a diameter would mean the lead projects from the die mouth and contacts the external punch (the one that goes in and out of the die to swage) outside the die. That won't work, because the lead will just bend and go off to one side, driving the punch also to one side. Lead wire has to be big enough so that the weight you want fits entirely inside the die and lets the punch line up before it encounters resistance.
Core cutters are available in a small precision size, the PCS-1, and a large size, the PCS-2. Other cutters are sometimes built in small runs for special markets, such as the multi-cavity PCS-4 and the two-size PCS-3 Econo-Swage cutter. Prices range from about $20 to $90. The smallest one that does the job well is recommended, and it depends on the volume and range of calibers as well as the largest caliber desired.
The procedure for cutting wire is simple. Mount the cutter on your bench, so that the handle swings over the edge horizontally. Pull off several feet of wire and feed the end down, through the proper size hole or set of die inserts in the cutter. Adjust the stop screw so that the amount of lead from the shear line to the top of the screw is the weight you want (see the charts Corbin provides for length/diameter/weight combo). Move the handle back and forth in short arcs while feeding the wire through the cutter, and catch the cut cores in a box placed under the tool.
Bullet Lube/Paper Patch
A smooth-sided, swaged bullet can be fired in either a cartridge gun or a muzzle loader. The diameter and method of lubrication can vary depending on the method of firing. Other variations include separate cartridge and bullet breech seating. The main distinction is the fit of the bullet to the bore and the effort required to push a muzzle loaded bullet down the bore, especially if it is fouled from prior shots using black powder.
CARTRIDGE LOADING
Black powder cartridge guns (usually rifles, but sometime also revolvers or single shot handguns) have the advantage of not requiring the bullet to first go easily down the bore toward the breech. This means that the bullet can be sized (either including paper patch, or directly for lubricated bullets) so that it fills the bottom of the rifling grooves. This is refered to as the "groove diameter" even if the grooves are not an even count. Odd numbers of grooves mean that a land is opposite a groove across the diameter, so the groove to groove diameter is measured as the bore plus two grooves, just as if the number of grooves were even.
The "bore" diameter is sometimes mistaken for the groove diameter (or more accurately, the groove to groove diameter). The bore is the hole drilled through the solid barrel before rifling is made. Rifling is the metal left at full bore diameter when grooves are cut away or pressed into the metal with button rifling. It is important to use the same terms when talking about bullet fit, even if we were all wrong, because at least we'd all be on the same page!
The best fit of a bullet is when it seals the gas from escaping but is not distorted by anything but the lands. That means, the bullet wants to be groove diameter when it is fired. For a cartridge gun, this is no problem. A typical .458 rifle would have a .450 bore and grooves that are .004 inches deep, so the groove diameter would be .458 (.450 bore plus 2 x groove depth).
If you wanted to shoot this bullet with a grease wad and a nitro card (terms which refer to a lube saturated felt wad, normally about half an inch thick and full bullet size, and a grease-resistant cardboard wad, treated or laquered so that the lube won't soak through and ruin the powder), then the swage die could just make the bullet groove diameter (.458). You'd swage it and load it, on top of the nitro card and grease wad. (You can easily make these items using a Corbin DCD-1 disk cutter die, by the way).
If you wanted to knurl or groove the bullet, and fill the cavities left on the surface by putting the bullets in a pan, melting some lube into the pan, and then after it cools, cutting out the bullets with a close-fitted thin metal tube or old cartridge case with the head cut off, you'd make the bullets smaller. The exact size would not be critical, though. When you roll surface diamond knurling or lube grooves on a smooth bullet, the metal displaced is pushed outward by a precise amount. The final diameter is set by how deeply you push in the knurling or grooves.
This means, you have absolute diameter control outside the minimum size set by the die! In other words, you can experiment with different knurling depth, and therefore make the bullet any size you like from a minimum of the as-swaged size up to perhaps 0.015 larger! If you got a swage die at .448 diameter (which is a typical paper patch size for 0.0025 thick conventional paper), you could use that die with knurling (or grooves) and bring it up to as much as .463 diameter!
The average diameter has not changed. The amount of metal pushed in to make the grooves or knurling is precisely the volume of metal that is pushed out to make the diamond knurl tips or expansion around the grooves. No metal is lost or removed. The weight is exactly the same. But you can adjust the diameter precisely to fit your bore, just by setting the depth screw on your Corbin HCT-2 or HCT-3 knurling or grooving tool! Try that with a core mould and a lube sizer...it costs you the price of a custom sizing die and you wind up pushing metal back toward the base if you try to go very far down. Instead of a new die, all it takes with swaging is a slight turn of the depth screw, and you can have any custom size you wish, within broad limits.
With paper patching, you will want to first determine the paper thickness you plan to use, and make sure you can get a good supply of that paper. Typical papers run from .001 to .0025 inch thickness. For breech-loading cartridge rifles, the fit after wrapping with paper will be the groove diameter. The paper wraps around twice, so the bullet diameter would be groove diameter minus 4 times paper thickness. For example, a .458 groove diameter, using paper of .002 thickness, would indicate a bullet diameter of .450 inches.
MUZZLE LOADING
If the same barrel was on a muzzle loader, the bullet would need to slide down the bore and depend on the initial powder gas pressure to expand a cup base or soft lead flat base into the rifling grooves. With a .450 bore, the bullet would slide easily down the bore using .002 paper if the bullet is made .442 inches in diameter. (That is, .450 minus 4 wraps of .002 paper (.008 inches) is .442 inches.)
If you use a false muzzle and a mechanical bullet starter, and clean the barrel after each shot, similar to the "slug gun" long range match shooting, then you may wish to have the bullet fit the bore and the paper patched bullet diameter fit the rifling. This means you will have to force the bullet down the bore and pre-engrave the paper. With the same barrel dimensions, the bullet would need to be made .450 inch diameter, and you would have to select paper that was exactly half the rifling depth or .002 inches thick. This would give you a .458 diameter patched bullet to mechanically ram down the bore. This would be virtually impossible with normal "hunting" style reloading, where the barrel isn't cleaned between shots and black powder is used, and the only tool you have is a ramrod.
None of the dimensions are written in stone. They just happen to be the most common requests, and seem to give good results for the thousands of people who order dies in those diameters. That doesn't mean your particular gun or method of loading is wrong if you do it differently and the results are good. Results are what counts. Shooting the bullet backward with a peanut butter coating would be right if you got one-hole groups and the pressures were safe. An unfortunate tendancy among some shooters is to elevate tradition or "what worked for everyone else" to a position usually reserved for religious rules.
After all, few of us actually know "everyone" else. We know what worked for a handful of people we know personally, or what worked for some of the folks we met at matches or read about in magazines. That number of people may seem like the entire universe of shooters in our discipline, but it isn't even close. Lots of shooters do very well in other countries, at other matches in other parts of our country, or by themselves without ever going to a sanctioned match. Many more shooters shoot similar but somewhat different kinds of matches where they apply other rules and discover different facts...some of which, within the rules, may well apply as well or better in our field. The shooter who keeps an open mind and experiments a bit with things that work in other areas will stand a much better chance of improving his shooting...even if "everyone" else says that isn't the way to do it.
For all the above reasons, feel free to specify any other ratio of fit of your bullet to barrel without encountering any resistance from the die-makers. If you leave it up to Corbin's die-makers, we'll provide what most people say is "right" because it seems to work for them. The fit would be based on the parameters outlined, and depend on how you want to load the bullet into the gun. But if you have other ideas, please feel free to try them! Not all guns have read the rules. Some guns perform their best with bullet weights and diameters that "everyone" says won't work. That is one of the reason shooting is only partly science. It is also partly art. Corbin cannot possibly tell you what will be accurate in your particular gun. You can tell us, after experimenting with different diameters, weights and loads. All we can suggest is what "everyone" says is likely to be accurate, based on a large number of past orders.
More Information
For more information, click the underlined topic:
- Bullet Swage Terminology: What do you mean by that?
- More About Lead: Moulds, cutters, hardness testing.
- Books About Swaging: Read all about it!
- Lubes, Cleaners: Corbin Chemical Products.
- Paper Patch Bullets: Swage and Wrap Details.
- Other Bullet Designs: From pellets to slugs.
- Standard Bullet Specs: Dimensions, angles.
- Paper Patch Software: Easy Design Calculator.
- Pro-Swage Die: Swaging in your reloading press.
- Corbin Swaging Presses: Faster, easier swaging.
Start writing here...
Replacing Casting with Swaged Bullets