 Jacket Reducing Dies: Draw down a jacket 22 Rimfire Jacket Makers: Make free jackets Bullet Reducing Dies: Draw down a bullet Serrator/Draw Dies: Put serrations in a jacket Expand/Trim Dies: Trim a jacket shorter
Two Kinds of Basic Draw Dies Corbin builds draw dies for two general purposes:
- jacket reducing
- bullet reducing
One is called the Jacket Reducing Die, catalog number JRD-1- (with -R, -M, -S, or -H suffix to show the kind of press it fits).
The other is the Bullet Reducing Die, catalog number BRD-1- (with appropriate suffix letter).
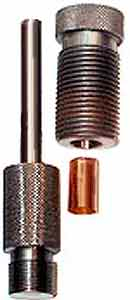
A jacket draw die or JRD has a punch which fits inside the bullet jacket (empty skin of the bullet). It can fit a piece of copper tubing (in which case it may have a shoulder to push on the edge of the tubing), or a closed jacket cup (no shoulder needed).
Two Kinds of Jacket Draw Dies...
A draw die for jackets simply pushes a larger jacket diameter through a specially shaped hole so it comes out smaller in diameter, and longer. The jacket wall can be made thinner, or not, depending on the clearance between the punch and the die walls. There are two designs for jacket draw dies, one for reducing the diameter only, and the other for both reducing diameter AND ironing the jacket walls to make them thinner.
These two kinds of draw dies are:
- JRD-1 (-R, -S, or -H types) for reduction of diameter only.
- JRD-2 (-S or -H types) for reduction of both diameter and jacket wall thickness.
 The amount of reduction that can be made depends on these factors:
- Original Jacket wall thickness
- Change in diameter
- Material hardness/ductility
- Original wall run-out
- Original jacket length
The original jacket wall thickness affects the force needed to draw down the jacket, and of course the amount of reduction changes the amount of force required. Obviously reducing a .050-inch thick jacket wall to 0.045 inches thick would move less metal than reducing it to 0.030 inches thick. And just as obviously, a jacket which starts at .030 wall thickness and is reduced to .015 walls involves 50% reduction in walls, whereas if it started at .020 the reduction to .015 would only be a 25% reduction. Force is related to amount of reduction.
The change in diameter usually is held to 30% or less of the original diameter. More reduction can require so much force that it is difficult to do, or can drive the drawing punch through the jacket base. The amount of reduction can be divided into two or more drawing steps, each with its own draw die, to avoid too much reduction in one step.
The hardness and ductility of course influence the drawing force required, and the strength of material being drawn will control whether the jacket is reduced or the punch simply breaks through the bottom of the jacket in the attempt.
Wall run-out is the difference in thickness around the jacket circumference. Typically a jacket of good quality might have only 0.0002 to 0.0005 inches of difference in thickness from one place to another as you measure and turn the bullet. A jacket for shooting big game that isn't expected to fire match-quality groups might have 0.001 to 0.002 inch run-out. Because the punch which pulls the jacket through the die bears on the jacket bottom, on the inside, the punch starts as a loose fit in the original diameter and can drift to one side, making the jacket eccentric in wall thickness. This is minimized when starting with a lower run-out jacket.
The length of the jacket will affect whether or not the punch, press ram travel, and die length can be used to reduce it. If a jacket is already too long for the system's available travel distance, including room to insert the jacket over the punch, then it can't be drawn without a larger system. But even if the original jacket fits into the available space with a given press, die, and punch set-up, after drawing to size it may become too long to remove from the punch automatically, or may require trimming to be useable either for a second draw to smaller size, or for use in making a reasonable weight of bullet. The closer a jacket becomes to the maximum practical length for a given press system, the less reduction can be done to it as reduction increases length.
Therefore, the factors that make a given draw possible are complicated and may require some research and development work, unless the job has been done here before and the parameters already determined for it. Some draws may not be practical in a hand press, or, if the ID of the jacket is very small and the reduction large, it may not be possible to apply enough force without bending the punch. In these cases, the draw may be accomplished in several stages, with more than one draw die, so that each step requires less reduction in diameter and therefore less stress on the material. Normal bullet jackets have walls that are from 0.020 to 0.050 inches thick, with the average about .026 and tapering to about .012 at the mouth. They are usually made of a 5% to 10% zinc, 95% to 90% copper alloy.
With the normal jacket, a reduction of perhaps 30% of the original diameter per draw is practical. That is, a .308 usually may be drawn to .257 (or anything larger such as .284) in one pass. The brittleness of the material, its grain structure and state of heat treatment (anneal) or work hardening will determine just how far any given jacket may be drawn.
J acket drawing is limited by another factor besides the jacket strength and rupture point. It is limited by the acceptable concentricity variation. When a jacket is pushed through a draw die, the punch which fits inside the jacket must be small enough so that it can pass through the tightest constriction in the die with the jacket around it. But this means that the punch will be smaller than the ID of the jacket before the jacket is drawn. Alignment of the punch to the exact center of the jacket will therefore be somewhat random, because the jacket can slip to one side as the punch and jacket enter the constriction area. The issue of concentricity is one that directly affects the complexity, labor time, and cost of making a draw die. A simple JRD-1- die is relatively easy to build, and provides good concentricity if it is used only to reduce diameter, not jacket wall thickness. By making the die with a "nest" or pre-alignment area for the jacket, the alignment between jacket and die is started properly and generally is maintained through the draw. The punch remains loose on the jacket ID after the draw, or at least is not tightly squeezed by the reduced jacket. The issue of concentricity is one that directly affects the complexity, labor time, and cost of making a draw die. A simple JRD-1- die is relatively easy to build, and provides good concentricity if it is used only to reduce diameter, not jacket wall thickness. By making the die with a "nest" or pre-alignment area for the jacket, the alignment between jacket and die is started properly and generally is maintained through the draw. The punch remains loose on the jacket ID after the draw, or at least is not tightly squeezed by the reduced jacket.For jackets having the jacket wall reduced as well as the diameter, concentricity is improved by using a more complex die, called the JRD-2-, that has a pre-alignment chamber for the jacket and a guide bushing on the punch, starting and holding it very straight as it goes into the constriction area. This insures that the jacket does not "tip" as it is pushed through the die, improving the concentricity over the basic draw die. Punches can be made of tougher steels, which tend to resist flexing but are more time consuming to heat treat. (See JRD-2 Draw Dies)  Corbin builds the simple JRD-1 for general purpose drawing, and the more complex JRD-2 to control of wall concentricity and for reducing the wall thickness while drawing the diameter down. The JRD-1 punch is a simple straight rod press fitted with threaded base base appropriate to the press ram, whereas the JRD-2 punch is from one piece of tougher steel either directly threaded into the ram or fitted to a 5/8-24 to 1-in x 12 thread base (for the -H presses) and fitted to a sliding alignment sleeve. Corbin builds the simple JRD-1 for general purpose drawing, and the more complex JRD-2 to control of wall concentricity and for reducing the wall thickness while drawing the diameter down. The JRD-1 punch is a simple straight rod press fitted with threaded base base appropriate to the press ram, whereas the JRD-2 punch is from one piece of tougher steel either directly threaded into the ram or fitted to a 5/8-24 to 1-in x 12 thread base (for the -H presses) and fitted to a sliding alignment sleeve.The JRD-2die has a cavity that accepts a sliding bushing on the punch, pre-aligning the die, punch, and jacket for a highly concentric draw. 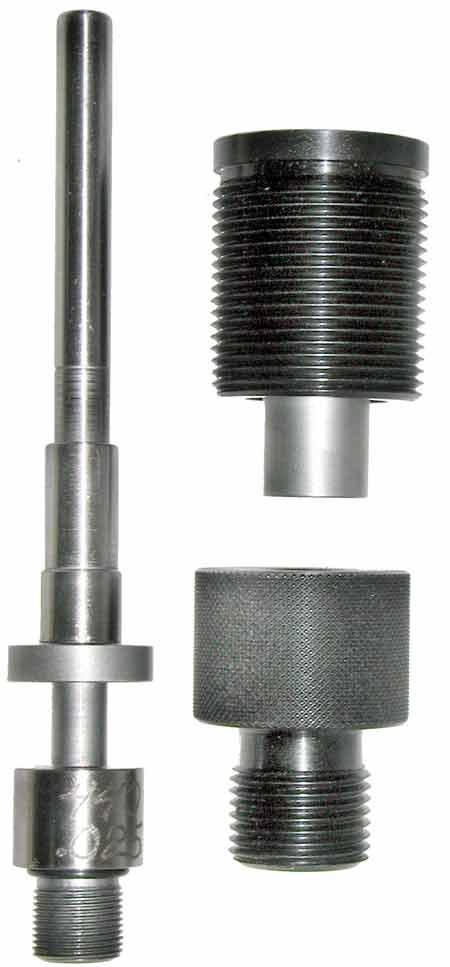 The JRD-1 die is used for simple reductions where the wall thickness does not need to be changed. Jacket drawing dies generally are not quite so critical in diameter control as bullet draw dies. The jacket can vary several thousandths without any ill effect, since it will be sized by the swaging process. The critical parameter is concentricity, not exact diameter. The JRD-1 die is used for simple reductions where the wall thickness does not need to be changed. Jacket drawing dies generally are not quite so critical in diameter control as bullet draw dies. The jacket can vary several thousandths without any ill effect, since it will be sized by the swaging process. The critical parameter is concentricity, not exact diameter.When a jacket is reduced, it pinches down on the punch and needs to be stripped off the punch before the punch and jacket are drawn back down through the die. Usually, applying lubrication inside the jacket with a swab cures most problems with sticking, breaking out the jacket base, and poor draws. A positive way to strip the jacket off the punch is to use the a stripper kit, which consists of a specific caliber (diameter) of JSP-1 Jacket Stripper Plate, aligned and held on the top of the press with the JSP-1 stripper pins. The pins are used for all calibers: they simply fit into two slots on either end of the flat stripper plate and let the plate slide back and forth. In the center of the plate is a key-hole shaped hole and slot. The hole is large enough to clear the jacket, while the slot is machined to just clear the punch diameter but let mouth of the jacket come to rest on top of the plate.   To use the stripper, push the plate so the hole aligns with the top of the die cavity, and draw the jacket. While the jacket and punch are raised above the top surface of the die, push the plate the other way so the slot is now under the jacket edge, then lower the ram. The punch passes through the slot, and the jacket comes to rest on top of the plate and is pushed free of the punch. Moving the plate takes only a gentle tap, either direction. To use the stripper, push the plate so the hole aligns with the top of the die cavity, and draw the jacket. While the jacket and punch are raised above the top surface of the die, push the plate the other way so the slot is now under the jacket edge, then lower the ram. The punch passes through the slot, and the jacket comes to rest on top of the plate and is pushed free of the punch. Moving the plate takes only a gentle tap, either direction.An electric power solenoid unit is also available for the Hydro-Press, which automatically moves the plate back and for as the ram cycles up and down, eliminating the need to touch the plate at all. |
| BULLET DRAW DIES A bullet draw die works by pushing the finished bullet through a hole, supported by the base in most cases. It is sometimes more desirable to support certain bullets by the nose, and when this is better, it is suggested either with the order or during the testing and development stage (as soon as we know).  The BRD-1-R die fits into a reloading press. The punch has a button "shell holder" appearance, and snaps into the RCBS type T-slot ram. The die is 7/8-14 threaded and screws into the press top like a reloading press die. The BRD-1-S (which is identical to what would be a BRD-1-M so we don't make a separate -M type) fits into the S-Press, or the older Silver Press or Series II press. It can also fit any other Corbin press if you adapt it with the reloading adapter bushing and a 5/8-24 ram adapter. The BRD-1-R die fits into a reloading press. The punch has a button "shell holder" appearance, and snaps into the RCBS type T-slot ram. The die is 7/8-14 threaded and screws into the press top like a reloading press die. The BRD-1-S (which is identical to what would be a BRD-1-M so we don't make a separate -M type) fits into the S-Press, or the older Silver Press or Series II press. It can also fit any other Corbin press if you adapt it with the reloading adapter bushing and a 5/8-24 ram adapter.The BRD-1-H fits the larger Corbin presses, such as the CSP-2 MegaMite and the CHP-1 Hydro-Press. It has the additional advantage of a longer punch and a stronger die. In general, use the reloading stroke on Corbin dual-stroke hand presses. Very long bullets may require a short helper punch or pusher rod behind the bullet after you push it as far as you can with the normal punch. If you should find that there isn't enough ram stroke to push a bullet through a die, most likely you have the press in the wrong stroke mode (short or swaging instead of long or drawing). Read the instructions again for your press, and note the way a Corbin hand press is changed from a short ram travel to a long ram travel by moving the ram pin to a different set of holes, and removing the knock out bar or the stop pin. (Sometimes people forget to remove the stop pin, and then the ram will not travel its full stroke in the long stroke mode.) 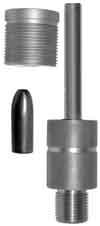 Bullet draw dies are not done absolutely "by the numbers" because different materials spring back by different amounts. Even the same brand of bullet made from a different lot of materials may have heat treatment, work hardening history, or other factors that affect the way the jacket expands after pressure from the draw die is removed, so slight differences in diameter will occur if anything about the bullet is different from the test and development samples. Bullet draw dies are not done absolutely "by the numbers" because different materials spring back by different amounts. Even the same brand of bullet made from a different lot of materials may have heat treatment, work hardening history, or other factors that affect the way the jacket expands after pressure from the draw die is removed, so slight differences in diameter will occur if anything about the bullet is different from the test and development samples.For high precision results, we must have exact samples from the same lot of bullet you intend to reduce. Otherwise, we can only guarantee that the samples we use for testing will come out the correct diameter. Other bullets pushed through the same die may come out from .0001 to .001 inches different in diameter from our test samples. This is only basic physics, not a quality control issue. If you want the best precision, send samples and then stick with that particular bullet.  Each bullet draw die is hand made and tested to exactly the diameter you specify, down to 100 millionths of an inch with the samples used for drawing. No two bullets made from different lots, or certainly different brands or weights, are likely to come out precisely the same diameter. The hole we make in the die is not the diameter of the bullet. It is larger or smaller depending on the reaction of the materials, and is determined by testing and adjusting in the final stages of construction. Each bullet draw die is hand made and tested to exactly the diameter you specify, down to 100 millionths of an inch with the samples used for drawing. No two bullets made from different lots, or certainly different brands or weights, are likely to come out precisely the same diameter. The hole we make in the die is not the diameter of the bullet. It is larger or smaller depending on the reaction of the materials, and is determined by testing and adjusting in the final stages of construction.A BRD usually costs less than a swaging die set. The BRD will make very good bullets if you keep the reduction (difference between the original and final diameters of bullet) to .006 inches or less. While you may be able to reduce a larger amount, the jacket and core begin to separate inside, and the bullet jacket begins to take on a curve shape. Lead begins to spurt out the open end of the bullet, and the shank portion becomes very long in comparison to the ogive. The ogive is intercepted at a point which is increasingly closer to the tip as you continue past .006 inch reductions, until by .010 inches the bullet may be unshootable. This of course varies somewhat with the specific design and caliber of bullet. |
The pressure needed to push a bullet through a hole that is smaller than about .006 inches less than the original bullet diameter becomes so great that the punch (which must pass through the hole as well) tends to push into the bullet base (or nose, on dies using a nose-pusher punch). The base material flows back over the punch, and can either shear off as it goes through the die or smear back as a thin sheet of metal.
In any case, a reduction of more than about .006 inches is considered destructive and harmful to accuracy, whereas one of .006 or less generally works. There is no magic about the .006 limit. It is simply a point where most people find the bullets on the cusp of acceptability; some will find a bullet acceptable that we would throw away, and some will find even a bullet that the majority of shooters find reasonably accurate to be unacceptable, so the exact amount of reduction that gives satisfactory results is subjective.
However, with bullet draw dies, we guarantee only that the bullet we use for testing and development of the die will in fact be the diameter requested. No warranty is expressed or implied about the accuracy, appearance, or any other feature of the bullet after drawing. We simply do not know, and cannot know, until the bullet is fired in your particular gun and judged by your particular standards. At that point, our work has been done.
It is with this understanding that we offer bullet draw dies. We normally recommend bullet swaging die sets instead, because of the precision, weight control, design features, and other factors that are under your complete control with swaging, and are not with drawing factory bullets.
In nearly all cases, perhaps 999 out of 1000, our clients have been more than happy with the results of a bullet draw die. In about 0.1% of the cases, the bullets are not what the client expected. We hope that by explaining the limits of bullet drawing, even that 0.1% will understand what to expect. In most cases the bullet is nearly as good, or even as good, as it was before reduction, in regard to practical field accuracy.
The less a bullet is reduced, the more satisfactory it will be. A .357 reduced to .355 is nearly identical in accuracy. A .338 reduced to .323 is less accurate although still shootable. A .308 reduced to .307 is as good as it was before reduction, for nearly any practical use. In the laboratory some slight difference can be found. Shooting a world class benchrest competition with reduced bullets might put you out of the top ten, but shooting varmints or deer or even most high power matches would most likely not make any difference to you or the targets-- provided you stay within the guidelines and provide samples, then use those same bullets.
If you can stand a tolerance of plus or minum one to five ten thousandths of an inch, you can most likely use different lots and brands of the same diameter bullet, provided you don't mix completely different construction styles (such as the Barnes solid copper bullets and conventional Sierra Matchkings). If you use the sample bullet that was used to build the dies, tolerances should be very nearly zero, unmeasurable with any screw thread micrometer.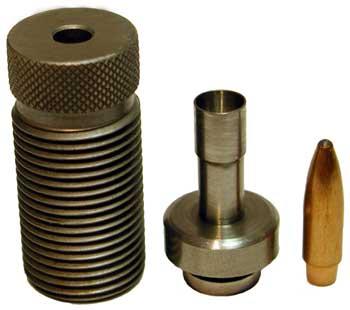 Operating a bullet reducing die is simplicity itself: you put the punch into the press ram, screw the die into the press head, and push the bullets through using the end of the stroke (adjust so that you use minimum effort and just get one bullet completely through before another one encounters pressure against its base).
There are two kinds of bullet reducing dies, the BRD-1-x and the BRD-1-xC, where the x is replaced by either R, S, or H depending on the press for which the die is designed. The BRD-1 is for flat, dish, or cup based bullets where the base will support the force against a flat punch tip and not become distorted. The BRD-1-xC is for RBT or boattail bullets, or for faster operation with any bullet. It uses special or custom designed components such as a punch with a spring-loaded sleeve guide to hold and support the bullet, so you don't have to do it with your fingers. The punch may also be machined to match the base, depending on how well the base tolerates the reducing force.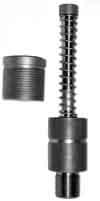
The special punch lets you quickly insert the appropriate bullet, remove your hand and stroke the press without fear of the bullet tipping over or falling off the punch. This means you can process bullets much faster than with the standard BRD-1. Also, the standard BRD-1 may not be appropriate for a boattail or hollow base, either because the base won't support the pressure unless the punch is machined to match it, or because the bullet will fall off the punch or be too hard to align without pinching your fingers!
See the Corbin Price List for current prices of the JRD-1-R, -M, -S, or -H, and the BRD-1-R, -M, -S, or -H dies. Draw dies come with simplified instruction sheets, and full details of operation are found in the Corbin Handbook of Swaging available from Corbin.
Serrate/Draw Dies
 A special kind of draw die is the Serrate/Draw Die or SDD-1- (-R, -M, -H). This kind of die puts shallow slits or grooves in the outside of a bullet jacket, so it will open faster on impact. The SDD-1 cannot selectively serrate a portion of the bullet that is in the middle of a parallel section: it serrates all of the parallel sides of the bullet at the time the jacket is pushed through.
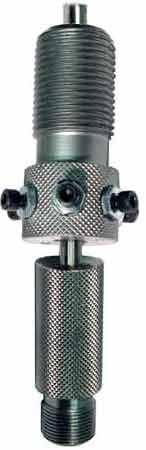 Since the ogive can be formed after the serrations are made, it is possible to have serrations on the curved portion of the bullet, all the way to the tip. It would NOT be possible to serrate the curved portion AFTER it has been curved in the point forming die, however. This die is also called a "Crown of Thorns" die, because it consists of a bullet-diameter cylinder with sharp cutter points positioned around the circumference, pointing inward and projecting an adjustable amount (from zero to perhaps 0.010 thousandths of an inch).
This process does not cut the bullet jacket through. It cuts a thin groove in the OD of the jacket, up to .01 inches deep. This groove then acts as a stress concentration point when the bullet impacts, causing the jacket to break open and peel back along the serrations, which are the weakest points in the jacket wall. Since the jacket is serrated before the core is seated (in most cases, although it is also possible to make a serrator for a seated core/jacket combo), the punch fits inside the jacket and does not touch the cutter teeth. You might use this draw and serrate die to make high fragmentation pistol bullets, highly frangible varmint bullets, or with low velocity rounds that cannot expand a normal jacket even with a large hollow point (or when the hollow point would interfere with operation of the gun). A discussion about your particular application is an important first step in getting the correct form of SDD-1. Subsonic bullet designs often include serrations, a large hollow point, and a blunt round nose. But serrations can only be made on a flat base jacket with the SDD-1 style of serrator. You must use the adjustable length SDD-2 style serrator with a rebated boattail base, in order to avoid putting serrations on the edge of the RBT base.
It is important to repeat: SDD-1 = FLAT BASE BULLETS, SDD-2 = EITHER FLAT OR RBT BASE BULLETS. The second kind of Serrator Draw Die is the SDD-2-S or SDD-2-H. This die fits into the press ram, and accepts a jacket with a seated core in it. The jacket is pushed open end first into the die using a fairly conventional punch that fits into the floating punch holder. The jacket is serrated only at the end, not full length. It is ejected back out of the die on the return stroke of the press. The ejector fits into the jacket mouth and is a loose fit into the die itself. The external punch fits the kind of base on the jacket, being flat or rebated boattail depending on the design of bullet.
The SDD-2 is generally used when you only want faster opening without fragmentation, or with a high retained weight for the rear portion of the bullet. It is required for use with the RBT base, but can also be used for flat base jackets. (The SDD-1 is ONLY used with flat base bullets, never with RBT base). It is used in combination with bonded cores, hollow points, tapered or heavy based jackets, or other means of making the bullet stay together at the rear while expanding faster at the front.
Start writing here...