The raw material for making a bullet usually consists of a lead core, and a jacket, or for lead bullets just the lead core itself.
While lead can be cut from spools of wire, using the Corbin PCS-1 Precision Core Cutter, or the larger PCS-2 Magnum Core Cutter, for those who have a good supply of soft lead, it may be more desirable to cast the cores.
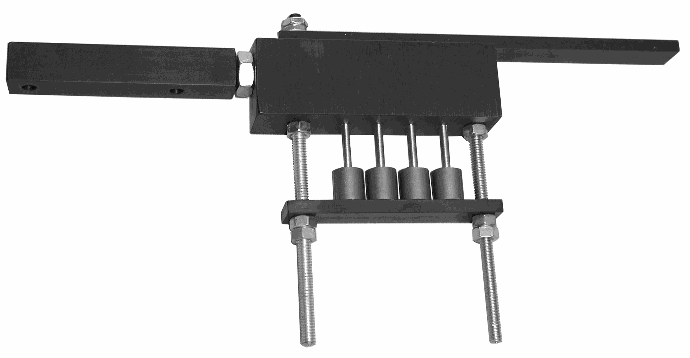
| Casting cores is practical from .170 to .700 diameter with the CM-4a Adjustable Core Mould, which makes four lead cores of adjustable weight at one time. This mold replaces the earlier CM-4 and CM-3 versions, which used a steel frame with steel cylinder inserts. The fine-grained iron block of the CM-4a allows for closer hole spacing, eliminates the fragile cylinder inserts, and simplifies the design while providing better casting characteristics. Each mold has four cavities of the same size, and a rest plate that lets you position the four pistons for any weight of core. The CM-4a mounts to the reloading bench (or, for those who mount a vise on their bench, to a short piece of 2 X 4 inch wood which is then clamped in the vise). There is no need for a mould handle, as the sprue cutter is long enough to push gently with a gloved hand (wear heat-resistant gloves and face protection when handling molten lead). The lead is simply poured into the "bathtub" slot, in the top of the sprue cutter/handle. It runs down into the bores, which are fitted with pistons that rest on an adjustable stop bar. The bar can be set to different heights, to change the volume displacement of the cylinders, and thus make different weights of cores. The sprue cutter/handle is moved to one side, cutting the sprues flush with the top of the mold block. Then the rest plate is pushed up, which raises all the pistons at once, and pushes the lead cores out the top of the mould. A box placed under the mould catches the cores when they are pushed over, upon closing the sprue cutter/handle. Using an ordinary open top lead melting pot and a good-sized ladle is the best way to pour the lead. Bottom pour pots designed for bullet moulds can be used, but a ladle should be filled and then used to transfer the hot lead to the core mould. The sprue left in the top can be lifted out with a pair of needle nosed pliers, or a bend paper clip with the end projecting into the sprue area so that the sprue solidifies around it. | |
The CM-4a is available in these standard diameters:
|
|
| Selecting the right size: JACKETED BULLETS For jacketed bullets, the core size has to fit into the jacket ID. The jacket ID is smaller than the jacket by twice the wall thickness. Also, the jacket OD is usually smaller than the finished bullet by two or three thousandths. The cast or cut wire core has to be small enough to fit into the core swage die, which adjusts the weight, reduces the length, and expands the diameter all in one stroke. For jacketed bullets, then, start with the jacket you plan to use. Determine the jacket ID. You can use a gauge rod that fits to the bottom of the jacket or you can measure the jacket OD, measure the wall thickness, and subtract twice the wall thickness from the OD. Bear in mind that the core needs to fit all the way to the jacket bottom. Usually, jackets have walls that taper toward a thicker base area. If you measure the jacket mouth and subtract twice that thickness from the outside diameter, it will give you the inside diameter at the mouth. But the core might hit the jacket wall half way down and trap air, if you size the core based on that measurement. Measuring the wall thickness at the base can be done by cutting a jacket in half length- wise, or by using a post and dial indicator (post has a flared end, dial indicator is mounted so it reads zero against the flared diameter of the post, and you slip the jacket over the post to measure wall thickness). A gauge pin slipped into the jacket is easier, but you need a set of pins. If in doubt, ask Corbin to measure your jacket ID. The jacket ID is the first step. A core swage die (CSW-1-S, CSW-1-H, or CSW-1-R) is used to adjust the core weight precisely. The core diameter needs to fit easily into the jacket ID. So allow from 2 to 10 thousandths (not critical, so long as the core fits to the jacket bottom without trapping air) for the difference between jacket ID and core OD. For example, if your jacket has a .253 ID at the bottom, the swaged core could be up to .251 inch diameter. It could be smaller, but not so small that heavy weights would make the core too long to fit into the jacket length. Now take this one step further back: the core mold diameter must make a cast core that fits into the core swage easily. So if, in our example, the core swage die makes .251 cores, then the cast core should be the next smaller standard diameter available (.247). The diameter of core from the core mold, for jacketed bullets, is based on whatever size of core swage die you will be using. That depends on the wall thickness of your jacket. So if you are using copper tubing jackets with .035 inch walls, and then decide later to make some bullets using drawn commercial jackets with .025 inch walls, the core which fits the tubing jacket ID will also go into the drawn jacket ID. You can use the same core. But if you started with a set designed for drawn .025 wall jackets and then later added .035-wall copper tubing jackets, now your larger core swage die won't work. You have to get a smaller core swage, and probably a smaller core mold to fit it. The best plan is to figure out what jackets you will be using, and decide if you might change the wall thickness later. If so, get the core swage and the core mold size that fits the thicker jacket wall, so you can also use it with the thinner one. There is no major drawback to using a core that is a little smaller than the optimal size. The only caveat is for very heavy bullets, where a slightly larger diameter would give you a shorter core, so it would fit into the die and into the jacket without sticking out the mouth. Cores that don't fit down into the die and jacket can cause a problem with getting the seating punch aligned and into the die or jacket. For instance, a .224, .243, or .257 jacketed bullet typically starts with a .185-inch core, which may be swaged to .190, .200, or .210 diameter in the core swage die before being inserted into the jacket. A .308 bullet typically starts with a .247 diameter core, which is swaged to .250 or .251 diameter for insertion into the jacket. The 9mm or .38 Special (.357) generally uses a .312 inch core, swaged up to aroung .318. But it isn't practical to list all calibers, jacket walls, and core diameters since no one knows in advance what jacket you might be using, and you would have to determine that when you select a jacket. All it takes then is a little subtraction to figure out the core size: Jacket OD - 2x wall thickness - .002 for easy fit into the jacket, - .002 again for easy fit into the core swage die. In short, subtract twice the jacket wall thickness and another .004 inches from jacket OD. That's the biggest core diameter you can use. Smaller ones are fine, down to the next standard size. LEAD BULLETS In a lead bullet, without a jacket, the core can be much larger. Usually a lead bullet is swaged in a LSWC-1 die, which combines the weight adjusting bleed holes of a core swage with finishing the diameter, forming the nose and base, all in one stroke. Therefore, while a .357 jacketed bullet might require a .312 diameter core mold, a .357 lead semi-wadcutter bullet would be easier and better made using a .340 diameter core mold. A .429 (44) lead bullet would use a .390 core mold, but a jacketed 44 (.429) would probably use a .365 diameter core mold. If you don't know the diameter of core mold that is required, you can just specify the caliber of bullet and whether it is jacketed or lead, and if jacketed, whether the jacket is commercial (thinner wall) or to be made from copper tubing (thicker wall). If you are making lead bullets by first swaging a core in a core swage die made for jacketed bullets of that caliber, and then reforming the core in a point forming die, you will of course have to use a core mold that produces a diameter which fits into the core swage die. A die set for making lead bullets without the SWC shoulder consists of a core swage and a point form die, normally skipping the core seater (which is used to put the core into a jacket, and expand both). In that case, the core swage die probably is going to be made just slightly smaller than the point form die, although with lead bullets it is possible to use a same-diameter LSWC-1 die as a core swage, followed by the point form die. All this means that your core mold can be much larger, even though you are using a core swage first, since the core swage is much larger than it would be for a jacketed bullet in that same diameter. Corbin's one-step airgun slug forming dies are similar to the LSWC-1 in making the complete bullet in one step, without a jacket, so the same plan applies: the lead wire needs to be smaller than the final slug diameter to fit easily into the die, but as close to the die bore as a standard mold will allow. It isn't necessary to get custom molds that are closer to the final caliber size, since the next smaller size of core mold works just fine. The lead will expand until it fills the die cavity, and then begins to bleed out through the weight-adjusting bleed holes. You just don't want to use such a small diameter that it is like a piece of spaghetti sticking out of the die to reach the weight you want. |
Troubleshooting tips:
- Use clean lead.
Reclaimed range lead and wheel weights usually are infiltrated with road dust, dirt, rock dust, and hard silica dust. Most of these impurities float on molten lead, and can be carefully skimmed from the top of well-fluxed lead as a dross. Impurities in the core will scratch the inside of the cylinder bores, making gouges into which the lead will "lock" when it cools. This makes the pistons hard to move, or even freezes them in place. Clean lead removes this source of trouble. - Do not beat on the ejector bar or pistons
Striking the ejector bar (rest plate) or the pistons in an attempt to make a "stuck" lead core eject will usually ruin the piston rod or cause other damage. Never beat upon any part of the mould. If a piston sticks in a cylinder, stop! Turn the mould upside down, remove the rest plate, put a heat-safe hot lead catching box or tray under the mould, and gently heat the stuck cylinder with a propane/air torch (not an oxy-assist or acetylene torch!) until you can remove the piston. Lead smears can be removed from the bore with a wrap of extra-fine 0000 grade steel wool wrapped on a cleaning rod. Stroke the rod in a straight back and forth motion in the heated cylinder (basically, melt out the lead and then wipe the smeared lead away). Do not chuck the cleaning rod in a drill motor and spin it in the cylinder. This will put circular grooves in the ID of the bore, which will further lock the next core into it. Straight lines are not a problem. The core will slide out even if there are vertical lines in the cylinder. Please note that if you pound on the mould to try and get something to move, you will probably ruin it, and this abuse will not be covered under warranty. - Use enough heat.
When casting in the four cavity mould, there is a considerable amount of heat radiation away from the surface area of the mould. It is necessary to use a higher lead temperature than you would with a standard bullet mould, or else the lead will cool off too quickly and result in partially filled bores. - Use a large enough ladle.
Small ladles tend to lose heat quickly, so that the lead cool and block the holes in the mould before it can pour to the bottom. Use a large enough ladle so that there is plenty of reserve heat to keep the lead molten as it pours. - Avoid high tin ratios.
The mould bores will tend to "solder" to a high tin content alloy. Using antimony to harden the lead instead of tin will help prevent this. Casting solder alloys is not recommended. - Avoid bismuth alloys.
Bismuth alloys usually expand on cooling, just the opposite of most metals. If the core expands in the cylinder as it cools, it will try to lock itself into the bore. The only safe way to remove it will be to turn the mould over, remove the piston, and carefully melt the metal out of the cylinder by application of a propane torch to the mold block. Linotype is an alloy containing bismuth, and tends to expand on cooling. It is also too hard for most swaging operations. - Make sure the pistons are down before closing the sprue plate.
If the pistons do not fall back down, check for tin/lead soldering in the cylinders, scratching from abrasive contaminants in the lead, or other reasons why the piston might be hard to move. If the pistons project from the top of the mould and you close the sprue plate, it will damage the piston, which may be bent or enlarged so it cannot drop back through the bore. If this happens, removal of the piston may require machine work to avoid damaging the bore.
Start writing here...
About Corbin Core Mould