| Before you can understand what tools you need, you need to know what they are called! | |
| If you don't know a die from a punch, or understand how bullet makers use terms like "hollow point" versus "open tip", it creates at least two major problems: |
|
We sometimes get orders from people who don't bother to learn the terminology of swaging, and it creates delays, errors, and misunderstandings that don't happen when the right word is used. If you understand that the die is the cylinder that holds the pressure to form a bullet, and it has an internal punch (which slides up and down within the die to eject the bullet) and an external punch (which pushes the components into the die to swage them, then is retracted from the die to allow ejection), you won't be trying to order a "die punch" or a "punch die" or a "rod" or a "piston" or a "ram" or a "thing-a-ma-bob". You'll order the internal punch you actually want, and get it, instead of getting messages and phone calls trying to figure out what you mean.
So, while it's no problem to toss words around in casual conversation even if the meanings are just "sort of understood", it is really to your benefit to use the right terms when ordering, communicating, and working in a specific technical field like bullet swaging. The words are more precisely defined, because a little difference like "open tip" versus "hollow point" can make a HUGE difference in the required equipment and techniques used.
In Corbin's bullet swaging systems, there are FOUR general categories of swaging dies and punches:
- Type -R dies and punches: These are used in Reloading presses, hence the "-R" at the end of the catalog number. Type -R dies have external punches which fit the T-slotted ram, and use a 7/8-14 adapter body to screw into the press head. To eject, you tap a knock-out rod in the die and catch the bullet with your other hand as it ejects downward from the die.
- Type -M dies and punches: These are early, discontinued tools for the old Mity Mite press (hence the "-M" designation) and its successors using 3/4-inch OD dies. They work in the first Corbin presses (Mity Mite, Silver Press), built decades ago. We still make them on special order today, and they also work in the modern -S type presses we build now (with certain modifications or changes to internal punches for point form dies). These dies and punches work exactly like the -S type, described next...(except they have a slightly shorter maximum bullet length).
- Type -S dies and punches: These are the main tools for swaging in the range of .10 to .458 diameter bullets in the modern Corbin -S press. The discontinued Series II and the current S-Press use these dies. The "-S" designation originally meant "Steel" because the Series II press was all steel. It also means "Small" compared to the type -H, described next. They have a 1.3-inch maximum bullet length. The external punch fits into a punch holder in the press head. The die and internal punch screw into the press ram, and automatically eject on the down stroke. You simply run the ram of the press UP to swage, and run it DOWN to eject. The bullet rises out of the ram-mounted die, and sits atop the die for you to pick up (about 3 times faster to use than a reloading press system). The -S dies have 5/8-24 threaded tenons on the 1-inch diameter dies. This fits into the press ram.
- Type -H dies and punches: These dies and punches fit the -H type presses, which includes the Mega Mite, the Hydro Press, and the Hydro Junior. The "-H" in the catalog designation means "Hydraulic", even though we make a big (70-lb!) hand press to operate them as well as hydraulic pressses. Just like the -S type, these dies screw into the press ram along with the internal punch, and automatically eject on the down stroke. The external punch is held in a punch holder in the press head. Type -H dies usually have a 1.5 inch body with a 1 inch tenon (threaded for 1 x 12 tpi). They can have larger bodies as needed for special higher pressure operations, such as 2 or 2.5 inches. In all cases, they use a 1-inch threaded tenon to fit the press ram.
| Catalog Numbers for Corbin Dies The catalog number of each "set" of dies is an abbreviation that describes what that set can make. A "set" of dies can be from one to six dies. You never use more than five of the dies for a given design of bullet, but you might use a different group of five dies depending on the bullet style. All the sets of dies are made up of combinations of individual dies you can buy separately. There is no price penalty for buying your sets a few dies at a time. You can start with a simple flat base open tip 3-die set, and add lead a lead tip die later. It costs the same as buying a 4-die set that includes the lead tip (LT) die. All sets of two or more dies start with a "Core Swage" or CSW-1 die. Core swaging is the act of forming the lead core to precise weight and shape before you use it in a jacket or shape it into a lead bullet. The core swage die has bleed holes that let you "squirt" surplus lead through them. (In the "old days" of swaging, some people called this a "squirt die".) If you make a lead bullet without a jacket, you may be able to form it in a single "LSWC-1" or Lead Semi-Wadcutter die. The term "Semi-Wadcutter" just means that a punch forms the nose, and leaves a small "shoulder" where the nose stops and the "shank" or parallel part of the bullet body starts. It does NOT mean a specific nose shape (other than the requirement that there is a shoulder formed by the edge of the punch). You can have round nose, Keith nose, conical nose, even full wadcutter nose shapes and they are ALL made in a LSWC-1 die (if you use no jacket). To make a bullet with a smooth curve from the ogive or nose to the shank, without a shoulder, you need to use a PF-1 point forming die and possibly a core seater or other preliminary steps in other dies. This is explained in detail at FJFB-3.HTM if you want to click it and jump ahead now. Or read on to become more enlightened about swaging!
| ||||||||||||||||||||||||||||||||||||||||||||||||||||
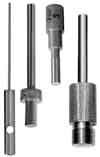
Punches  Click a picture for information about standard and special punch types for type -R, -S, and -H die sets. The punches are the "rods" that move inside the dies. They seal the pressure within the die. The internal punch stays inside the die and moves toward the die mouth to eject the component or bullet. The external punch separates from the die on each stroke of the press, to allow insertion of another component and to make room for ejection. Please do not call a die a punch, or vice versa, as it will be very confusing and your orders will often be wrong. Ordering a "die-punch" also makes no sense to us, because either you want a die (the cylinder that holds the pressure) or a punch (the piston or rod that fits into the die), or perhaps you want the complete "die set" which is the die with its associated punches. If you want a punch, you will want either an external punch, or an internal punchl. Usually we can tell by the context, but it helps if you learn the difference and order what you really want. Click a picture for information about standard and special punch types for type -R, -S, and -H die sets. The punches are the "rods" that move inside the dies. They seal the pressure within the die. The internal punch stays inside the die and moves toward the die mouth to eject the component or bullet. The external punch separates from the die on each stroke of the press, to allow insertion of another component and to make room for ejection. Please do not call a die a punch, or vice versa, as it will be very confusing and your orders will often be wrong. Ordering a "die-punch" also makes no sense to us, because either you want a die (the cylinder that holds the pressure) or a punch (the piston or rod that fits into the die), or perhaps you want the complete "die set" which is the die with its associated punches. If you want a punch, you will want either an external punch, or an internal punchl. Usually we can tell by the context, but it helps if you learn the difference and order what you really want. | ||||||||||||||||||||||||
DIE SYSTEMS (-R, -M, -S, -H) In each of the catalog numbers, you will see a letter designation, followed by a dash and a number. The number refers to the quantity of individual dies that are in the set, or in a few cases refers to a special variation on the set. The individual dies for swaging are combined into matching sets to build certain kinds of bullets. All dies and punches are made to fit a certain "system", refering to the press into which they are installed for operation:
| ||||||||||||||||||||||||
DIE SETS Although you can order each individual die to make up sequences of operations, or "sets", it is more convenient to order commonly used sets by a single catalog number. The price is the same, and you can add additional dies to expand the capability of any set, at any time. For instance, you can order a CSW-1-S core swage to make exact core weights, a CS-1-S core seater to put the cores into the jackets and expand the jacket to size, and a PF-1-S point former to shape the ogive on the seated core and jacket and thus finish the bullet. OR you could just order the three dies, as a set, called the Full Jacket Flat Base set or FJFB-3-S. This is the "3-die set" which is the basic starting point for almost any bullet other than wadcutter or semi-wadcutter (shouldered) styles. Later, you might want to add rebated boattail capability, so you could order the RBT-2-S Rebated Boattail 2-die add-on set. Now you would have the same thing as if you had ordered the FRBO-5-S 5-die set. Count'em. You have five dies total, and can use them for either flat base (3 dies, using core seater) or rebated boattail (4-dies, using the RBT-2 sequence and not using the CS-1-S core seater at all). For clarity, the catalog numbers are all for type -S dies. But you can also get them all in the type -H or type -M (obsolete, but made for older presses). Not all are available for the -R (reloading) press due to limitations of reloading presses for swaging.
|
| ||||||||||||||||||||||||
  | Swaging Diagram (1) Swaging Diagram (2) Ultra-Low Drag (ULD) Base Guards(TM)  HP, OT bullets Elliptical Ogives Copper tubing jackets How to Swage Swaging Books Software | |||||||||||||||||||||||
You can order a swaging package by sending samples, drawing, or photo of the bullet you wish to make, and this information:
|     | |||||||||||||||||||||||
Now you should know what a die set does, how many dies are in it, and what press it fits, just from the catalog number! Here are some examples:
|

| Open Tip versus Hollow Point In bullet swaging, the term "Hollow Point" refers to a hole poked into the core. The term "Open Tip" refers to a bullet in which the jacket is longer than the core. Unfortunately, it is fairly common but sloppy practice in the industry to call an open tip (OT) bullet a "hollow point" (HP). In swaging, this causes problems... To make an open tip, all you do is seat the lead core so it is shorter than the jacket. An open tip bullet uses a core length such that when it is seated (pressed into the jacket so the jacket expands under pressure), the core will be shorter than the jacket. You can look into the bullet tip and see empty space. Nearly all sets of dies come with a diameter of core seating punch that fits inside a specific jacket, and seats the core to make an open tip. To make a hollow point, you just need a punch that has a projection or conical probe machined on the tip. When you seat the core using this punch, the projection pushes a hole into the core. You can order the "HP" punch either as full diameter of the core seating die (which makes a Lead Tip Hollow Point bullet) or to fit inside the jacket (which makes an Open Tip Hollow Point bullet). So, you can specify a HP-LT or a HP-OT. Generally, if you just say HP, we'll assume you want a lead tip hollow point, and send a HP punch that fits the die bore, not the ID of the jacket. But you CANNOT specify an OT-LT. That is a contradiction. Either the bullet has an open tip (core shorter than jacket) or a lead tip (core longer than jacket). It can't be both at once! You CAN specify that the core comes right to the end of the jacket. Nosler calls this design a "protected tip". It simply means that when you have finished the bullet, the lead core will be extruded forward in the point forming step just enough to bring it even with the jacket edge. So it starts out as an open tip, just with more lead than would be used with a regular open tip design. You would use an open tip punch, not a lead tip seating punch. | |
 | This is a hollow point lead tip bullet. |
 | This is an open tip bullet (which happens to be a 4-S spitzer ogive, also). |
 | This is an open tip hollow point bullet. |
Start writing here...
Swage Die Terminology